**External Validation of Display Latency in Chrome**
Alex Forrence
September 12, 2022
As part of my [Google Summer of Code 2022 project](https://summerofcode.withgoogle.com/programs/2022/projects/RiwyAVic) to reduce presentation latency in Chrome on Windows, I wanted a way to measure the delay between when something is drawn by the user (e.g. in a [requestAnimationFrame](https://developer.mozilla.org/en-US/docs/Web/API/window/requestAnimationFrame) (rAF) callback) and when it actually appears on the screen.
# Design
Using a phototransistor mounted directly to the monitor and a microcontroller (MCU) for communication, we should be able to get an idea of the presentation latency. Thanks to Chromium's support for the [WebHID API](https://developer.mozilla.org/en-US/docs/Web/API/WebHID_API), the microcontroller can directly coordinate with the browser.
The general idea is this:
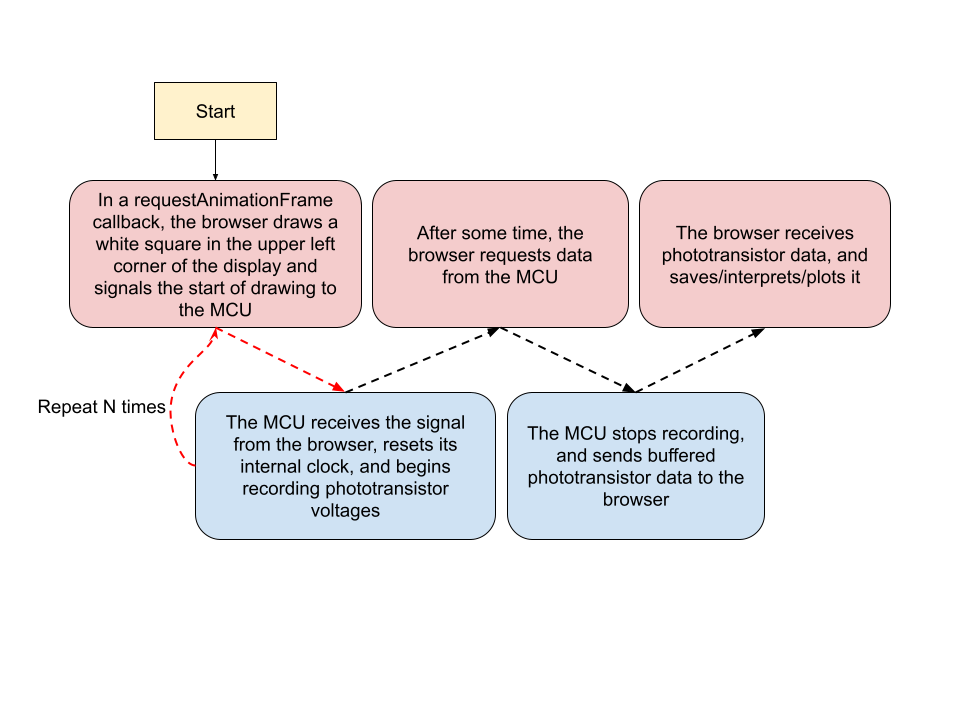
The difference in time between the clock reset and the rising edge of the phototransistor voltage *should* give us the total display latency in the system.
It's important to keep in mind that this measurement will only be reliable within a single device/display combination. The display has its own associated delays, depending on the post-processing settings that have been toggled.
## Hardware
I used the following hardware:
- 1x [Teensy 4.0](https://www.pjrc.com/store/teensy40.html)
- 1x [HW5P-1 phototransistor](https://www.adafruit.com/product/2831)
- 1x 10k resistor
- Misc wires, breadboards, etc. to put it all together
There are probably many other ways to achieve this same basic phenotype (a light-sensitive sensor + a device to interpret that data & communicate with the host computer).
I picked the Teensy 4.0 for a few reasons (beyond already having on hand):
- It's a high-speed USB 2.0 device, meaning it can send & receive data with very low latency.
- It has an onboard analog to digital converter (ADC), which is convenient.
- It has an Arduino-compatible API, which makes it relatively easy for non-electronics people to get hooked up.
- Great software support from Paul Stoffregen (the creator) & community. The [forums](https://forum.pjrc.com/) are an excellent resource.
The phototransistor was primarily selected because of:
- Great rise/fall times (~2 μs, according to the [datasheet](https://cdn-shop.adafruit.com/product-files/2831/HW5P-1_2015__1_.pdf)).
- Through hole part-- easy to solder/generally manipulate by hand.
- Minimal supporting circuitry required-- just one resistor!
 The physical connections are straightforward, mostly boiling down to getting the long & short legs of the phototransistor the right way around (long leg connects to Vcc). This is a [common-collector amplifier](https://www.onsemi.com/pub/Collateral/AN-3005-D.PDF), which has a low voltage output in the dark and high in the light.
The other bit you may want to do is shield the phototransistor from ambient/external light. I've used a (cleaned) bottlecap with holes punched for the phototransistor leads, and that seemed to function well enough. The shield also gives you a surface for attaching tape/other things when mounting the phototransistor to the computer display.
## Software
### Microcontroller
The Teensy's toolchain and libraries are installed and managed through [PlatformIO](https://platformio.org/).
The Teensy 4.0 microcontroller is programmed in C++, and uses prepackaged libraries for [timing](https://github.com/luni64/TeensyTimerTool) and configuration of the [ADC](https://github.com/pedvide/ADC). The Teensy communicates with the host computer using the Raw HID interface, which uses interrupt transfers to move data between the Teensy and computer. This *should* give us great latency performance-- approximately 125 μs one-way. In reality, we may expect to see significantly worse performance than that, depending on the operating system/software (see this [white paper](http://www.embeddedsys.com/subpages/resources/images/documents/InterruptsAndUSB.pdf) for more).
### Browser
The browser must have the WebHID API available to communicate with the microcontroller (see [caniuse](https://caniuse.com/webhid) for current status). These tests are intended for Chrome on Windows. We use the canvas for drawing visuals, and serialize outcoming data as JSON.
# Assessment
### Part 1: Communication Delays
Ideally, the duration of communication between the microcontroller and browser should be minimal (i.e. less than a few milliseconds). Any more may affect our ability to discriminate whether the rising edge of the phototransistor corresponds to one frame or another. It's difficult to test latency in a single direction without synchronizing the clocks of our two devices, so we'll instead measure the round-trip time and keep the two clocks independent.
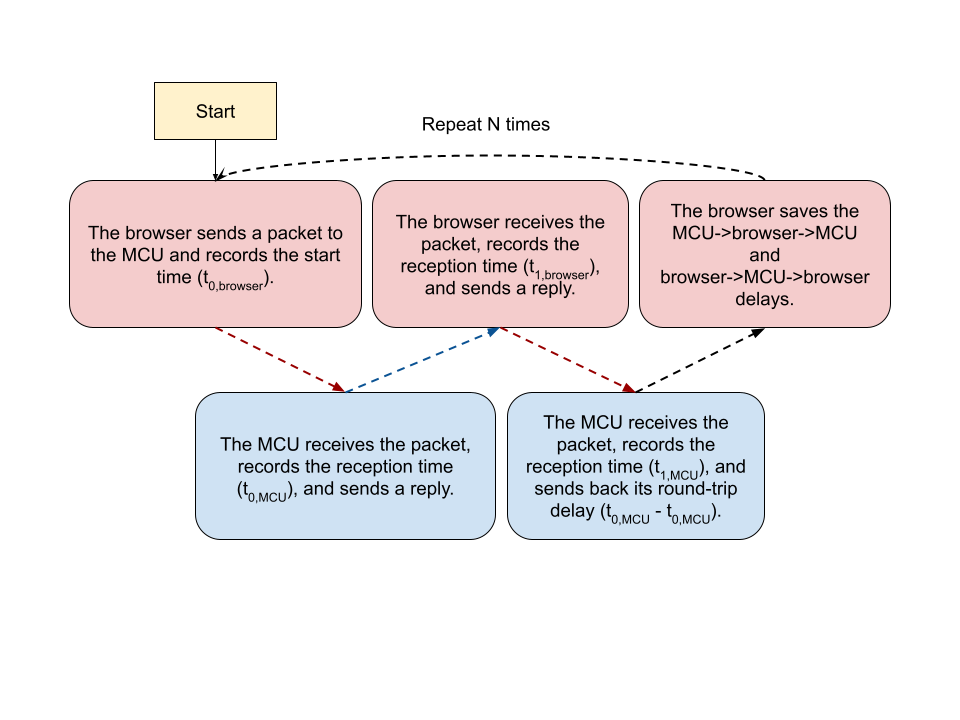
We'll compute the round-trip delay in *both* directions, which might give us a sense of any asymmetries in communication delays.
Time to plug in and upload code to the Teensy, and fire up a local server for the test site (under roundtrip/site). To kick off the measurement, we need to interact with the webpage. This will trigger the device connection dialog, and we should be able to select the "Teensyduino RawHID" from the dropdown list. After selection, the website and Teensy will communicate a number of times, and you should eventually see a plot like this:
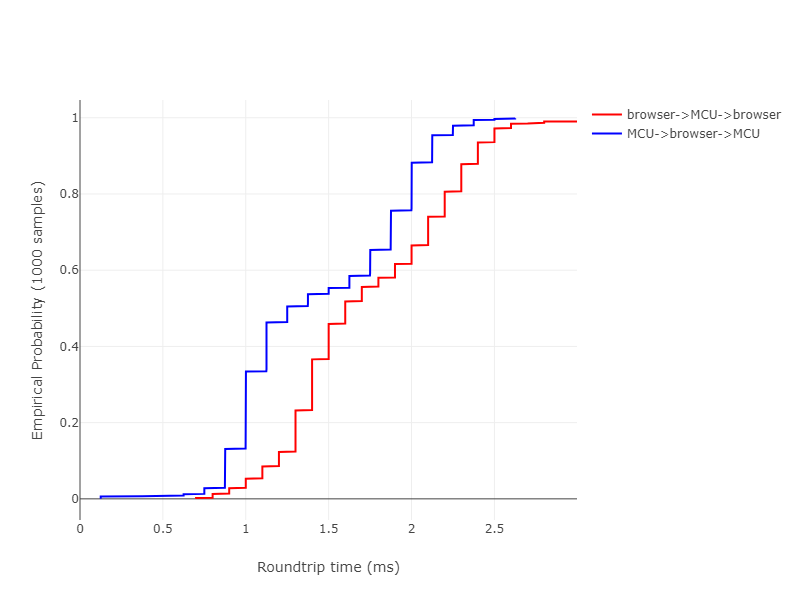
We can see that on my laptop, the majority of round-trip times are less than ~2.5 milliseconds (suggesting a naive single-trip time of ~1.25 milliseconds). It looks like the MCU-origin round-trip is slightly faster than the browser-origin one, though perhaps not enough to make a meaningful difference. This timing jitter should be acceptable for our measurements, depending on the display refresh rate (60Hz in this case). Other machines may perform better-- for instance, my desktop takes roughly half the time for both measurement types.
### Part 2: Display Latency
 Onto the main event: display latency. The phototransistor now comes into play, and the overall design is as described [earlier](index.md.html#Design). After updating the Teensy's firmware with the `lag-tester` code, we can run this test. This one takes two interactions (when the device is enabled): one to connect to the Teensy, and the second to start the testing session. At the end, the page produces a JSON file containing raw timestamps, sample counts, and phototransistor measurements. As a first pass, I have been doing data processing in R (see `lag-tester/data` for sample data and analysis script), but this could be done in the browser in the future.
The raw traces we get from the microcontroller look something like:
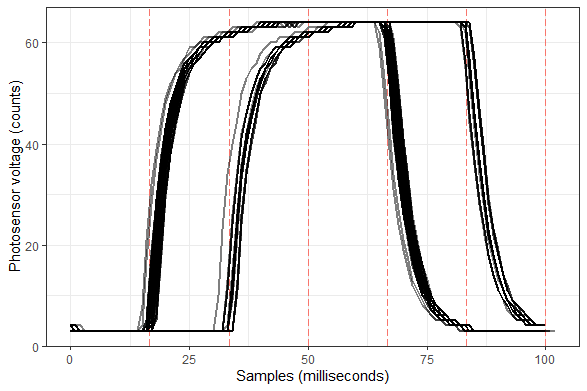
Note that the phototransistor traces very closely align with the estimated VSYNC times, which makes it relatively straightforward to infer which frame the image was visible on. In this case, it looks like te presentation delay varied between one and two frames. The traces are not very noisy in this case, but some cleaning/extra processing *may* be necessary depending on the display (e.g. my desktop display has a 60Hz flicker).
# Closing Thoughts
Hopefully this was a useful overview of one way to measure presentation latency (in Chromium). Feel free to send feedback/questions. See the [repository](https://github.com/aforren1/chrome-lag-test) for the code and documentation (including this site).
Other thoughts:
- Can latency be inferred from DXGI frame statistics/is this any better than our method, esp. if the application can infer whether the DWM is active or not?